
@artdesignsbysassy
Reflections Composite


April 26, 2023
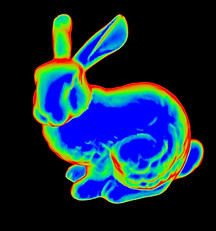
I've been working on a test animation for my rabbit that I think will showcase my reflections and fractures well. When I opened Maya today to continue working on my project, I noticed that my rabbit model looked like the image on the left when rendered. I spent some time trying to figure out why because I was sure I didn't change anything. Sure enough, I realized that I accidentally changed the transmission depth from 0 to 1 on the glass shader (aiStandardSurface). Changing this back to 0 instantly fixed my issue.


April 25, 2023
Here are some of the AOVs that I've been working on and plan to use in my final composite. My position map (top left) is rendering all green and I'm thinking that's due to me not having anything attached to that layer. I still need to figure out why my diffuse direct and indirect AOVs are rendering all black and I'm guessing it could be that my light isn't strong enough or something could be wrong with those layers in general.


April 23, 2023
For this update, I've been working on trying to get the look of the rock texture right for my rabbit. I also had an issue with my other file where my Fresnel layer stopped rendering correctly so I had to pretty much start from scratch with tumbling the camera, which lucky for me, didn't take too long because I've had practice. What I've found by studying my rock is that it doesn't have a whole lot of transparency, it's actually pretty opaque so I've been careful about not making it look too much like glass. My rock reference also has thicker "ribbons" inside rather than small, thin ones so it appears that most of my rabbit will have to be those ribbons. There aren't too many bubbles if any in my rock but I wanted to work on including just a few small ones for a more realistic look. My rock has a very strong specular level which is pretty close to being pure white which is why I haven't touched specular much at all.


April 18, 2023
Here's my progress so far with the camera tumbling and placement of the rabbit model as well as the keylight in my scene. The middle image is a test of the Fresnel effect on my model, and according to my rock reference, I think I need to have the red and green layers both be thinner or have the red be thinner and the green be thicker. I think this because my rock doesn't have a ton of translucency towards the edges like the other rock models do, it's more thick and heavy opaque color in the middle. I realized while working on this that the shadow matte layer needs to definitely have the plane end along that line on the left side of the windowsill in order to get that sharp shadow cutoff of where the windowsill ends. I am still working on the material of the rabbit to include that sharp specular highlight and subtle translucency that the rock has.


April 17, 2023
Over the previous weekend, I spent time taking photos with my chosen rock with some of my classmates. My goal was to get nice even outdoor lighting, however, the sun had other plans and kept going behind the clouds so it was difficult to get the same lighting in every photo. After our photoshoot, I decided to take some extra photos in my dorm room just in case the photos we took didn't turn out well. The photo on the left is the photo that I took from my dorm window and I prefer this one to the one from our photoshoot because since I took it from indoors, it was easier to control the exposure from the sun as well as the amount of bounce light I was receiving from the ground the rock is on. I feel like the image on the right is washed out while the image on the left has a higher level of contrast which is what I was looking for. I wanted to use an image with darker properties because I chose a rock with warmer and brighter colors. I plan to put the rabbit model in the left bottom quadrant of the image so that it lines up with a focal point on the rule of thirds.